IntelliTrace and the ‘magic’ of Historical Debugging

I love my job, I get to spread the good news on how to work efficiently with source code and solve very real-life problems.
I recently visited a development team in Nevada that was eager to learn more about Visual Studio debugging tools and the C# compiler Open Source project in GitHub, named ‘Roslyn’.
The highlight of the sessions was the ‘discovery’ of IntelliTrace and how they could use this feature in improving the communication between the development team in Nevada and the QA team at another location. A few hard to reproduce bugs had been filed recently, one of them being intermittent without a consistent set of steps to reproduce. This team was using process dumps and WinDbg to try and pinpoint the cause, but, even though process dumps have their reason of being, the size of the dump files made the quest to search for a root cause quite difficult.

This is until they tried IntelliTrace in their QA environments.

IntelliTrace is similar to a flight recorder. It records every event the airplane goes through from take off to landing. IntelliTrace had its debut in Visual Studio 2010 Ultimate and is now here to stay.

Continue reading IntelliTrace and the ‘magic’ of Historical Debugging

PowerShell Profiling

As part of my job I help developers take a closer look at the source code and analyze it under the “microscope”. Part of this analysis is profiling the performance of different components on a solution for CPU usage, Network usage, IO and Memory usage. Trying to pinpoint areas of the code that consume the resources and see if there can be optimizations. This is what is known as profiling an application or a solution.

Visual Studio 2017, Community, Professional and Enterprise editions, all offer profiling and performance analysis tools. They cover a variety of languages,  and types of targets to be profiled. The image below shows the different profiling targets that can be analyzed with the Performance Profiler.

Performance Profiler in VS 2017

In the world of DevOps, part of the build automations are done using scripting languages, and one of them is PowerShell. After one of the training sessions on performance analysis and profiling with VS 2017, the question was posed:

How can we analyze the performance of PowerShell scripts to determine the areas of the code that consume the most CPU and take the most time to complete?

The main aid that the VS 2017 perf tools offer is the ability to show the source code that takes the most CPU utilization (identifying these sections of the code as “Hot Paths”) and the areas of the code that will place the most objects in the heap without being garbage collected by any of the three garbage collection cycles (memory leaks). VS 2017 profiling tools and diagnostic tools can also analyze multi-threaded applications or applications that use parallel tasks. But how about profiling PowerShell code? How can a similar profiling be done to PowerShell source code to look at CPU and Memory utilization?

Visual Studio 2017 does not offer a specific profiling wizard or GUI for PS to correlate the OS CPU performance counters and the Memory counters with the PowerShell script code.

That being said, you can still profile PowerShell code, it’s not as easy though.

Using PowerShell you can still access the CPU counters and Memory counters available in the operating system.

This can be done using the System.Diagnostic namespace or in versions of PS 3.0 to 6.0 you can use the PS cmdlets in the namespace Microsoft.PowerShell.Diagnostics

https://docs.microsoft.com/en-us/powershell/module/microsoft.powershell.diagnostics/?view=powershell-6

You can also use the Windows Management and Instrumentation cmdlets, but the recommended way for profiling a process on remote hosts is to use the WinRM and WSMan protocols (newer protocols) and their associated cmdlets.

These were the only references I’ve seen on the web regarding CPU and Memory analysis of OS processes using PowerShell:

https://stackoverflow.com/questions/25814233/powershell-memory-and-cpu-usage

https://stackoverflow.com/questions/24155726/how-to-get-cpu-usage-memory-consumed-by-particular-process-in-powershell-scrip?noredirect=1&lq=1

https://docs.microsoft.com/en-us/powershell/module/Microsoft.PowerShell.Management/Get-Process?view=powershell-6

https://docs.microsoft.com/en-us/powershell/module/microsoft.powershell.management/get-wmiobject?view=powershell-5.1&viewFallbackFrom=powershell-6


Now, for using the WMI protocol on a host, the WMI windows service needs to be up and running and listening on TCP/IP port 135. WMI is an older protocol built on top of DCOM, and some hosts have this windows service stopped as part of the host hardening.

WinRM is a service based on SOAP messages, it’s a newer protocol for remote management with default HTTP connections listening on TCP/IP ports 5985. If the connection uses transport layer security with digital certificates the default HTTPS port is 5986.

WMI, WinRM and WSMan only work on Windows Servers and Windows Client Operating Systems.

One needs to inject profiling like cmdlets directly into the PowerShell code to find the code hot spots that cause high CPU utilization.  This can work but then one needs to remember to either comment out or delete the direct instrumentation when the PowerShell code is run in the production environment.

If you have profiled your PowerShell automation scripts some other way, we’d love to hear your experience.


Happy coding DevOps!

Microsoft and Open Source

I love open source and have used open source technologies throughout my career. I programmed using the LAMP stack in the early 2000s, worked with Red Hat Linux before RHEL came about and contributed with unit tests and bug fixes to two open source frameworks: one logging framework and one ORM. So when my colleagues and friends knew I joined Microsoft, they were sure I wouldn’t be able to use open source software or publish any source code under an open source license.

Well… times have changed, like, really really changed! …and the Open Source Community is thriving, even at Microsoft. Talk Openly Develop Openly,  aka TODO, is an organization focusing on the challenges and opportunities of managing open source projects.

There is a Microsoft Code of Conduct that you should follow when you join one of Microsoft OSS communities. And yes, the code is for everyone to see. If you can understand it, there is no reason why that “truth” or source code should be hidden from you.

Do you want to contribute shaping the future of the .NET framework ecosystem and create open source solutions using this platform? Do you want to contribute to the a portion of the actual framework? You can, but you should abey by the rules of an open source community, which might not be as forgiving as a closed code one.

Happy coding!

C# Scripting available in the .NET Framework 4.6

I know I have a few friends and coworkers that prefer to have all the scripting done in their language of choice, C#. Before .NET 4.6+ their best bet for automating DevOps tasks in a Windows based infrastructure was, for the most part, PowerShell.

But, if you’re already familiar with the C# syntax and basic namespaces, why can’t you continue to use your favorite language to write scripts?

Well, now you can.

Thanks to the Roslyn compiler project, you can now use the nuget package to use the Scripting API.

The Scripting API, as of today, requires the .NET Framework Desktop 4.6 as a minimum, with the .NET Core this Scripting API should now be cross-platform. I haven’t tried it yet, but will do in a very near future and will blog about my experience using this Scripting API on CentOS.

Some directives that are present in PowerShell might not be present yet on the Scripting API (I’m thinking cd, ls etc), but it is worth the try.

You can also script away using C# in a browser, any browser… And we now have a new file extension for C# scripts => .csx files.

C# Scripting and csx file projects are highly used in creating Bot services hosted on Azure using the RESTful APIs provided by Azure.

Happy coding and I hope you enjoyed the good news of C# Scripting.

Code away!

HTTP Secure, Part II. Is Diffie-Hellman always used in the HTTPS key exchange?

The initial post for Part I – HTTP Secure is here.

I got a question right after I had spent a week in training classes for the COMPTIA Security+ exam: to describe how HTTP Secure (HTTPS) modifies the HTTP traffic between a client browser and the server.

At the end of my explanation, this person also asked me what was the role of Diffie-Hellman algorithm in the whole process.
I was almost sure that Diffie-Hellman isn’t used all the time in HTTPS  but I didn’t know how to explain, on the spot, when is Diffie-Hellman actually used. The person asking me the question was part of a review board and was adamant that Diffie-Hellman was always used.
I’ll abbreviate Diffie-Hellman as D-H for the remaining of this post.

How is the HTTP traffic between a server and a client modified when the channel is encrypted? What is SSL?

What is the role of the D-H key exchange algorithm?

Is D-H always used in HTTPS?

Those are the questions I’ll try to answer on this post.

How is the HTTP traffic between a server and a client modified when the channel is encrypted?

Similar to an HTTP request, the client begins the process by requesting an HTTPS session. This could be by entering an HTTPS address in the URL or by clicking on an HTTPS hyperlink. Now, when the link must be secured the server responds by sending the server’s certificate. The certificate includes the server’s public key. The matching private key is on the server and only accessible by the server. The client then creates a symmetric key and encrypts it with the server’s public key. The creation of the symmetric session key is what differs in the different versions of SSL and could use D-H in some cases for the generation of the exact same key by the client and the server, so the key is never actually exchanged.  This symmetric key (also called ephemeral key or session key) will be used to encrypt data in the HTTPS session.  When D-H is not used, the client sends the encrypted session key it generated to the web server. This key is encrypted using the server’s public key. Only the server’s private key can decrypt the cypher and obtain the client’s session key. If attackers intercept the encrypted key, they won’t be able to decrypt it since they don’t have access to the server’s private key.  The server receives the encrypted session key and decrypts it with the server’s private key, this is not true when D-H is used though, as the server generates an identical session key as the one that was generated by the client. At this point, both the client and the server know the symmetric/session key. All of the session data  exchanged over the link is encrypted with this symmetric/session key using symmetric encryption.

In the case the server is configured to accept client certificates to authenticate the client, the exchange differs a little from the one described above. Digital certificates provide a way for the clients to trust the server with validations that can be done of the certificate presented by the server, but this subject (client certificates involved on the HTTPS exchange and server authentication using digital certificates) is beyond the scope of this post.

What is SSL?

SSL Secure Sockets Layer (SSL) is an encryption protocol used to encrypt Internet traffic. For example, HTTPS uses SSL in secure web browser sessions. It can also encrypt other transmissions. For example, File Transport Protocol Secure (FTPS) uses SSL to encrypt transmissions. SSL provides certificate-based authentication and encrypts data with a combination of both symmetric and asymmetric encryption during a session. It uses asymmetric encryption to privately share a session key, and symmetric encryption to encrypt data displayed on the web page and transmitted during the session. Netscape created SSL for its web browser and updated it to version SSL 3.0.  The IETF created TLS to standardize improvements with SSL. TLS Transport Layer Security (TLS) is a replacement for SSL and is widely used in many different applications. The IETF has updated and published several TLS documents specifying the standard. TLS 1.0 was based on SSL 3.0 and is referred to as SSL 3.1. Similarly, each update to TLS indicated it was an update to SSL. For example, TLS 1.1 is called SSL 3.2 and TLS 1.2 is called SSL 3.3.

SSL keeps the communication path open until one of the parties requests to end the session. The session is usually ended when the client sends the server a FIN packet, which is an indication to close out the channel. SSL requires an SSL-enabled server and browser. SSL provides security for the connection but does not offer security for the data once received. In the protocol stack, SSL lies beneath the application layer and above the network layer. This ensures SSL is not limited to specific application protocols and can still use the communication transport standards of the Internet. Different books and technical resources place SSL at different layers of the OSI model, which may seem confusing at first. But the OSI model is a conceptual construct that attempts to describe the reality of networking. The SSL protocol works at the transport layer. Although SSL is almost always used with HTTP, it can also be used with other types of protocols. So if you see a common protocol that is followed by an s, that protocol is using SSL to encrypt its data. SSL is currently at version 3.0. Since SSL was developed by Netscape, it is not an open-community protocol. This means the technology community cannot easily extend SSL to interoperate and expand in its functionality. If a protocol is proprietary in nature, as SSL is, the technology community cannot directly change its specifications and functionality. If the protocol is an open-community protocol, then its specifications can be modified by individuals within the community to expand what it can do and what technologies it can work with. So the open-community version of SSL is Transport Layer Security (TLS). The differences between SSL 3.0 and TLS is slight, but TLS is more extensible and is backward compatible with SSL.

The SSL/TLS Handshake Protocol
The most complex part of SSL is the Handshake Protocol. This protocol allows the server and client to authenticate each other and to negotiate an encryption and Message Authentication Code (MAC) algorithm and cryptographic keys to be used to protect data sent in an SSL record. The Handshake Protocol is used before any application data is transmitted. The Handshake Protocol consists of a series of messages exchanged by the client and the server.

The Figure below shows the initial exchange needed to establish a logical connection between the client and the server. The exchange can be viewed as having four phases.

Handshake Protocol in Action 

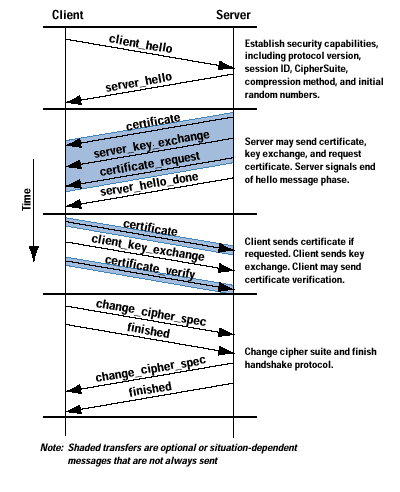
After sending the client_hello message, the client waits for the server_hello message, which contains the same parameters as the client_hello message. For the server_hello message, the following conventions apply. The Version field contains the lower of the version suggested by the client and the highest version supported by the server. The Random field is generated by the server and is independent of the client’s Random field. If the SessionID field of the client was nonzero, the same value is used by the server; otherwise the server’s SessionID field contains the value for a new session. The CipherSuite field contains the single CipherSuite selected by the server from those proposed by the client. The Compression field contains the compression method selected by the server from those proposed by the client.

What is the role of the D-H key exchange algorithm?

D-H is a key exchange algorithm used to privately share a symmetric key between two parties, it wasn’t deviced in the context of digital certificates and pre-dates them. The Diffie-Hellman scheme was first published in 1976 by Whitfield Diffie and Martin Hellman. The idea of D-H is that it’s easy to compute powers modulo a prime but hard to reverse the process: If someone asks which power of 2 modulo 11 is 7 , you’d have to experiment a bit to answer, even though 11 is a small prime. If you use a huge prime istead, then this becomes a very difficult problem

The D-H algorithm enables two systems to exchange a symmetric key securely without requiring a previous relationship or prior arrangements. The algorithm allows for key distribution, but does not provide encryption or digital signature functionality. The algorithm is based on the difficulty of calculating discrete logarithms in a finite field. The original Diffie-Hellman algorithm is vulnerable to a man-in-the-middle attack, because no authentication occurs before public keys are exchanged.

Is D-H always used in HTTPS?

The answer is NO. In practice, Diffie–Hellman is not used with RSA being the dominant public key algorithm.

The first element of the CipherSuite parameter (see the Handshake Protocol in Action figure above) is the key exchange method. The following key exchange methods are supported on HTTP Secure:

RSA: The secret key is encrypted with the receiver’s RSA public key. A public-key certificate for the receiver’s key must be made available.
Fixed Diffie-Hellman: This a Diffie-Hellman key exchange in which the server’s certificate contains the Diffie-Hellman public parameters signed by the certificate authority (CA). That is, the public-key certificate contains the Diffie-Hellman public-key parameters. The client provides its Diffie-Hellman public key parameters either in a certificate, if client authentication is required, or in a key exchange message. This method results in a fixed secret key between two peers, based on the Diffie-Hellman calculation using the fixed public keys.
Ephemeral Diffie-Hellman: This technique is used to create ephemeral (temporary, one-time) secret keys. In this case, the Diffie-Hellman public keys are exchanged, and signed using the sender’s private RSA or DSS key. The receiver can use the corresponding public key to verify the signature. Certificates are used to authenticate the public keys. This option appears to be the most secure of the three Diffie-Hellman options because it results in a temporary, authenticated key.
Anonymous Diffie-Hellman: The base Diffie-Hellman algorithm is used, with no authentication. That is, each side sends its public Diffie-Hellman parameters to the other, with no authentication. This approach is vulnerable to man-in-the-middle attacks, in which the attacker conducts anonymous Diffie-Hellman exchanges with both parties.

References:

Harris, Shon. CISSP All-in-One Exam Guide, Fifth Edition (Kindle Locations 16125-16152). McGraw-Hill.

SSL: Foundation for Web Security – The Internet Protocol Journal – Volume 1, No. 1

Gibson, Darril. CompTIA Security+: Get Certified Get Ahead: SY0-301 Study Guide 

The Secure Sockets Layer Protocol

HTTP over TLS

Diffie Hellman Key Agreement Method.

DNS records, small reminder of their differences

I had to make DNS changes today to support some legacy applications we’re are replacing but will be in use for the next two months until the go live date.
To avoid going to the Network plus book and look for this info, or to avoid Googl-ing it away, I thought I would write down this small reminder to myself.

Differences between the A, CNAME, ALIAS and URL records

A, CNAME, ALIAS and URL records are all possible solutions to point a host name (name hereafter) to your site. However, they have some small differences that affect how the client will reach your site.

Before going further into the details, it’s important to know that A and CNAME records are standard DNS records, whilst ALIAS and URL records are custom DNS records provided by DNSimple’s DNS hosting. Both of them are translated internally into A records to ensure compatibility with the DNS protocol.

Understanding the differences

The A record maps a name to one or more IP addresses, when the IP are known and stable.
The CNAME record maps a name to another name. It should only be used when there are no other records on that name.
The ALIAS record maps a name to another name, but in turns it can coexist with other records on that name.
The URL record redirects the name to the target name using the HTTP 301 status code.
Some important rules to keep in mind:

The A, CNAME, ALIAS records causes a name to resolve to an IP. Vice-versa, the URL record redirects the name to a destination. The URL record is simple and effective way to apply a redirect for a name to another name, for example to redirect www.example.com to example.com.
The A name must resolve to an IP, the CNAME and ALIAS record must point to a name.

Understanding the difference between the A name and the CNAME records will help you to decide.

use an A record if you manage what IP addresses are assigned to a particular machine or if the IP are fixed/static.
use a CNAME record if you want to alias a name to another name, and you don’t need other records (such as MX records for emails) for the same name
use an ALIAS record if you are trying to alias the root domain or if you need other records for the same name
use the URL record if you want the name to redirect (change address) instead of resolving to a destination.

If you trace the request responses with an HTTP sniffer like Fiddler, you’ll see in this case a 301 Code returned from the server to the browser before the redirection happens.

Repairs are done. I can keep blogging about technologies and interesting things in the IT world.

I had upgraded my blog without backing it up first, something I never do. I noticed after the upgrade and the theme change that the links to the archives were missing, returning 404 error codes. I tried repairing the permalinks and repairing each database table with no luck.

Thanks to the Penguin Web Hosting folks who host my site, they rapidly compared the latest set of fileson their daily backups with the current directories and noticed the .htaccess file missing.

The file was restored and the links to the archives are functional again.

If you ever wonder what the Apache .htaccess file does, here’s a good hyperlink to a page on the subject.

Never upgrade or promote a release to your prod environment without a backup or a rollback plan.
I should have known better :-p

Happy coding!
PG.

Issues with old archives

Hi visitor,
I installed a WP update with a specific custom theme without backing up my file system and the links to the archives and categories have been lost, leading to 404 Pages. I’m aware of this. Thank you to all the people that have contacted me via email to let me know. The comment links also lead to 404 pages. We are in the process of restoring the lost files from the backups. Bear with us!
Thank you.
-PG

To Microservice or not to Microservice – helpful links and resources

Microservices is an approach to application development in which a large application is built as a suite of modular services. Each module supports a specific business goal and uses a simple, well-defined interface to communicate with other modules.

Microservices introduction:

Introduction to Microservices Whitepaper

Microservices pattern

The initial white paper on microservices by Martin Fowler and James Lewis (it is a bit dense, but it highlights the intent of this architecture and it is one of the first whitepapers published on the subject):

Martin Fowler’s whitepaper

Using API gateway to get coarser calls and group microservices:

API Gateway pattern

Foreign Key relationship conundrum:

Foreign Keys and Microservices

Distributed transactions and microservices, how to keep referential integrity:

Distributed Transactions Strategy in Microservices

Netflix whitepaper:

Netflix Architectural Best Practices

IASA Free Resources/Whitepapers:

Why to choose Microservices

Successfully implementing a MSA

And finally, if you have a pluralsight trial subscription and you prefer to watch a video instead of reading a bunch of articles, this course is a good introduction to the pattern, the MSDN Professional subscriptions should include a few courses trial at Pluralsight for free:

Pluralsight Training

Happy design and coding!

Role Based Access Control in ASP.NET MVC

Role Based Access Control in ASP.NET MVC is pretty straight forward. There is also a way to do Claims access control, but the most common way is the authorization of a user based on the roles they have in an organization.

This blog post only explains RBAC using ASP.NET Model-View-Controller framework for web applications.

As a developer, to show or hide action links in a View, depending on the user role you can use the following Razor syntax:

@if (User.IsInRole("Administrator"))
{
...
}

On the Controller class, to avoid access to an action if the user types in the URL directly on the browser, we can annotate the action with the Role check tags.

For example, the following code would limit access to any actions on the AdministrationController to users who are  members of the Administrator group.

[Authorize(Roles = "Administrator")]
public class AdministrationController : Controller
{
}

You can specify multiple roles as a comma separated list;

[Authorize(Roles = "HRManager,Finance")]
public class SalaryController : Controller
{
}

The SalaryController  class above will be only accessible by users who are members of the HRManager role or theFinance role.

If you apply multiple attributes then, a user’s HTTP request, accessing the methods on the controller  must be a member of all the roles specified. The following sample requires that a user must be a member of both the PowerUser and ControlPanelUser role before authorization is granted.

[Authorize(Roles = "PowerUser")]
[Authorize(Roles = "ControlPanelUser")]
public class ControlPanelController : Controller
{
}

You can further limit access by applying additional role authorization attributes at the action level;

[Authorize(Roles = "Administrator, PowerUser")]
public class ControlPanelController : Controller
{
    public ActionResult SetTime()
    {
    }
 
    [Authorize(Roles = "Administrator")]
    public ActionResult ShutDown()
    {
    }
}

In the previous code snippet members of the Administrator role or the PowerUser role can access the controller and the SetTime action, but, only members of the Administrator role can access the ShutDown action.

You can also lock down a controller but allow anonymous, unauthenticated access to individual actions.

[Authorize]
public class ControlPanelController : Controller
{
    public ActionResult SetTime()
    {
    }
 
    [AllowAnonymous]
    public ActionResult Login()
    {
    }
}

There is also a way to use Policies for limiting access, but to keep it simple, since we already have the roles defined, we can use the common RBAC for now until we need something more complex.

When the user requests the URL directly they will get a nasty 401 Unauthorized page from IIS if their request is not Authorized.

The Razor code shown on the first code snippet can be used in the View to show the elements on the View, if the User is part of the Administrators role, but if the requestor (user) is not part of the role, he or she will receive a 401 HTTP Unauthorized response.

We can give them a more friendly page explaining they don’t have permissions to access the resources requested and link them to a request access page.

This is what could be done:

For a 401 you will probably be seeing the standard 401 Unauthorized page, even if you have added 401 to the customerrors section in your web.config. When using IIS and Windows integrated Authentication, the check happens before ASP.NET MVC even sees the request.

By editing the Global.asax file you can redirect to a route created for 401 Unauthorized HTTP response errors, sending the user to the “Unauthorized to see this” View (friendly page). The use case for this scenario would be if someone received a link for a View that requires the user to be authorized but  the user has not completed other steps in the process, such as paperwork needed prior to accessing the secure resource.

In the Global.asax:

void Application_EndRequest(object sender, System.EventArgs e)
{
    // If the user is not authorized to see this page or access this function, send them to the error page.
    if (Response.StatusCode == 401)
    {
        Response.ClearContent();
        Response.RedirectToRoute("ErrorHandler", (RouteTable.Routes["ErrorHandler"] as Route).Defaults);
    }
}

and in the Route.config:

     routes.MapRoute(
               "ErrorHandler",
               "Error/{action}/{errMsg}",
                new { controller = "Error", action = "Unauthorized", errMsg = UrlParameter.Optional }
     );

and in the ErrorController class:

public ViewResult Unauthorized()
{
        //Response.StatusCode = 401; 
        // Do not set this or else you get a redirect loop
        return View();
        //where View is the friendly .cshtml page
}


Voila!

Happy coding.